Bare Metal Raspberry Pi
Earlier in the week I wrote a post on CS 452, a real-time operating systems course I’m taking this term. One of the limitations of the course is that that the hardware for the project is only accessible from the lab on campus. Since the current coursework only involves working with the ARM system and not the model trains, I decided to see if I could set up my Raspberry Pi for development at home.
The code for my CS 452 project is quite low level — we’re writing an RTOS that will eventually run a train control system, so everything is done in C or assembly. There aren’t any standard libraries, communication is done over a serial port, etc. Setting up a comparable environment on a Raspberry Pi meant removing the OS and developing directly on the hardware. I spent several days this week getting everything working and figured I would collect the information in one place. I don’t consider myself to be an experienced systems programmer or hardware hacker. As such, it’s not really fair to label this post (or any other posts on this topic) as tutorials. I do hope that someone finds them useful, however. For more in depth tutorials on ARM assembly as it pertains to the Pi, I highly recommend this series.
I’ve decided to develop my bare metal Raspberry Pi project alongside the code I’m writing for school. There are several things I want to try that aren’t in the scope of the CS 452 project, but I’d still like to use the Pi to test out code for school projects. I plan to post semi regular updates on both my CS 452 project and my own at–home development. Eventually I’d like to put my Pi code up on GitHub, however not until the school term is over. Some of the code I’m using for my CS 452 project will likely appear in the Pi project, so for academic integrity reasons it seems best not to post anything yet.
Ideal Setup
The most basic Raspberry configuration requires two things: an SD card with compiled code and a power supply. While such a setup may be fine when running a Linux distribution, it isn’t really ideal for bare metal development. Every time a change is made to the program, the SD card will need to be updated with a new binary file. Swapping the SD card between a Raspberry Pi and another computer when code is recompiled becomes tedious very quickly (I started with this approach). Another potential issue is that frequent use of the SD card holder and USB power plug can put unnecessary wear on the hardware. Ideally it should be possible to update code on the Pi without removing the SD card; i.e, booting over an Ethernet connection.
Without external tools it’s also quite difficult to debug code running on the Pi. It’s possible to hook up an external keyboard and display, however interfacing with peripheral devices adds a lot of complexity. It’s far easier to communicate with the Pi’s UART over a serial port than it is to write text to a screen.
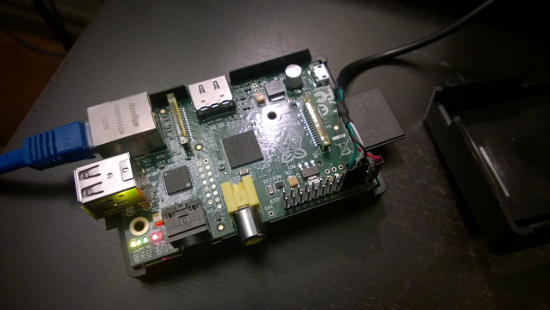
My Raspberry Pi configuration: serial cable w/ +5V, ethernet cable and no micro usb power
Bootloader
The Raspberry Pi boot process is fairly complex and, as far as I know, closed source. Apparently the GPU boots first, then jumps to the boot code on the SD card which eventually runs the binary file provided by the user. By default the bootloader looks for the kernel.img binary, however alternative file paths can be specified by editing config.txt. Typically the binary is some sort of Linux kernel; in the case of bare metal development it’s either custom code or another loader stage.
To get started with developing for the Pi hardware it is sufficient to simply replace kernel.img on the SD card with a compiled binary. This requires the tedious reflashing approach described above, however, so I looked for a different solution in my setup.
At first I used U-Boot and ran my code by transferring it to the Pi via TFTP. This approach worked well, however U-Boot was too bulky for my liking. I eventually found a GitHub project called Etherboot that loads the binary using a lightweight client/server model. The project isn’t very polished (and not actively maintained), however I’ve had a lot of success using it to load code. It’s also quite compact, so I plan to add some features when I have the time. Needless to say, Etherboot requires the Pi to be connected to a router via an Ethernet cable.
Serial Connection
The other major component in my Pi development setup is an Adafruit USB to Serial cable. The cable connects the RX/TX pins on Pi to a USB port on my laptop, which can then be used with a terminal emulator like GTK Term or GNU Screen to talk to the hardware. One of the other nice features of the cable is that it provides a +5V lead that can be connected to the appropriate pin on the Pi. This can be used in place of a micro USB power source, which reduces the number of cables needed.
To make use of the cable, the Raspberry Pi needs to send and receive bytes over a UART port. The low level samples David Welch has on GitHub provide working examples of communicating over the UARTs on the Pi.
Fast Reset
One other nice feature that’s lacking from the stock Raspberry Pi hardware is a reset switch. It’s apparently easy to solder one on though, since the hardware has the appropriate connectors. I haven’t done this myself as I don’t have a soldering iron, however I did try bridging the connection with a jumper clip and it does indeed reset the board.
Development Progress
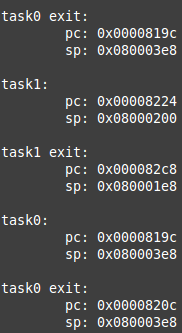
The context switcher work!
The current milestone for the CS 452 project is a working context switcher and the ability to create and schedule additional processes. As such, I wrote a simple implementation on my Raspberry Pi today that switches between a kernel and two different user processes. Some of the context switch code came from my CS 452 partner Rollen — he spent some yesterday working on the hardware in the lab.
I used input from the UART to determine which user process to run, as well asprovides useful debugging output (stack pointers, PC, PSR, etc). The user processes themselves simply blink the LED at different rates depending on the state of some of the variables on the process stacks. The code isn’t very polished, but it was a nice reintroduction to ARM assembly.
The next item I’d like to complete is to write some generic Makefiles to build the same code for the school hardware and Raspberry Pi. Some of the functionality, such as the UARTs and LEDs, is platform specific and will need to be pulled out, but much of the code should be portable.